Hello all
Here is where you will find our project and tutorial downloads it will disapear for a few hours late wednesday night and reappear on a Thursday morning at 5pm
Challenge 7
Making your own abstract stamps from Scrap rubber and Kling-on.
After cutting out the beautiful stamps from this weeks Beautiful stamp sheet . I was left with some scrap rubber and still had loads of kling-on left
Loath to throw things away I thought that I could use the Scrap rubber which would have gone in the bin, with some of the remaining kling on to create some of my own abstract stamps.
These are the two stamps I made

You need tweezers and an acrylic block, scrap rubber and kling on
The stamp on the right I cut a peice of kling on, you can cut any shape you want. I then cut up thr large frame that wasaround the edge of stamp sheet. I put the kling on kling side down onto acrylic block, then removed backing. I cut the frame into different lengths then positioned them onto the sticky side of the kling-on with the tweezers. I arranged different peics until I was happy with the design. Make sure than none of the peices overlap
The second stamp. I just cut up the flat rubber into random shapes to create a mosaic style stamp, making sure that none of the peices overlap
You can experiment with cutting different shapes from the rubber and arranging them into a design as a complete stamp.
CHALLENGE 6
This weeks downloadable project is a tutorial on how to create These Chipboard moonglow ink tiles

You can download the project at Filefront HERE
Hope you find this useful and great fun .
Challenge 5 project
This weeks project is the fabric bag

You can download the instructions here PROJECT DOWNLOAD
Challenge 4 project

Todays project doesn’t really have a lot to do with opposites attract but I was playing around with some new stash Starburst Stains and Magic colour acrylic inks and baby wipes I liked the effect and thought I would share it with you . So if you like the look of this melted baby wipe background you can download the instructions HERE
Here is another example of the same background using

different colours . Both backgrounds are very shimmery I also ended up with another background as well . Thats this weeks project. Don#t forget to check out this weeks free downloadable papers
Challenge 3 Clearly Clever Acrylic Tag Pendant necklace
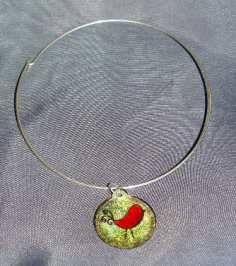
Project sheet available for download HERE
Challenge 2 Project Bolt of fabric bead

1 Make a striped cane as per http://www.polymerclaycentral.com/cyclopedia/stripedcane_mia.html tutorial only off set the ends of the strips very slightly. Then cut a 1/4 inch slice from the narrow end. Run through pasta machine on setting 2 with stripes vertical . This will create a long thin strip with stripes running the length of the piece.
2 Cut one end of the strip with a tissue blade so it is straight and leave the other end rough. Tidy up the side edges. If you want to decorate your fabric, Select stamp and ink with pigment ink of your choice stamp gently onto the strip. . To paint any detail You can use ranger alcohol inks as paints which gives a very light look. Clean brushes quickly
3 Use a pencil sized dowel or wrapped in foil or metal rod or sized for the project requirements and wrap the straight end round until you have a complete circle .
4 Bake as per manufacturers instructions.
Other ideas
You can make bolts of fabric with basic jelly roll slices , Place 2 slices together then work down until you have 2 by 4 jelly roll slice press gently together then run through pasta machine for a Psycadelic look,
You can use some flower canes but you will get a stretched look, So take this into account
Or if you make a striped cane of 2 layers then run though pasta machine , cut in half
Place opposite colours together run through machine again . Cut in half , etc. Then repeat once more. Then create a jelly roll. Then slice aprox 1.8th inch 2 by 4 you get a malachite effect .
Hopefully by next week I will have the photo tutorial down
Great polymer clay tutorials
http://polymerclaynotes.com
http://www.pcpolyzine.com/tutorials.html
The choker and chain were bought from Daisy chain beads this weeks sponsor. You need to phone for the chain and neck torque choker
Challenge 1 project download

If you like the look of it you can download project instructions HERE. See you next week


I would be interesteed in entering the challenges sometimes, but how do I send the entry. Is it to be sent by post, and where to, or is it to be emailed, and where to? Hoep you don’t mind me asking but I saw the mail on the Docraft forum and had to have a look.
Diane (Crafty Vonx)
[…] Pictured: Acrylic Bird Tutorial […]